
Thursday, December 20, 2012
Randomness
Got bored today, so I just made a background using the gradient tool, filter > distort > wave, and a lot of layers. I also used the hue/saturation tool to add color to the picture. This is what the background looks like.
 Not much else to say.
Tuesday, December 18, 2012
Finished Sphere
This time around there wasn't much to do. All I had to do was adjust the shadow so it matched the sphere better, added an ambient shadow, and add a small highlight to the sphere. I also added some white to the edge of the sphere and blended it in to make the sphere seem a bit more realistic. Aside from those minor adjustments, not too much has changed, but here is a picture of the finished sphere so you can see it for yourself.


Friday, December 14, 2012
Another Sphere
Yes , you read right, another sphere. However this one is in black and white instead of shades of red. I like this one better because it is easier to see what areas need better shading or lighting when it's in black and white. Anyways, here is the sphere.


Wednesday, December 12, 2012
Sphere
Right now I am working on making a sphere in Photoshop, and so far it seems to be going well so far. Not much else to say XD.
 I still need to shade the bottom better but it's good so far.

Monday, December 10, 2012
Random Paint Job
Remember when I said I had screwed around with the paint brushes last post? Well this is actually one of my random paintings using the brush tool, made easy by the fact that there is a grass brush tool that makes grass according to the two colors you have in your hotbar (green and white in this case). The clouds i just used a white paint brush with a low flow level and low opacity level. Simple enough.


Paint
On Thursday the class was assigned with getting used to the paint tools and settings since we would be using them soon, so I started screwing around with them (some were actually pretty cool). Afterwards we were told to use the paint tool to blend three colors. This is what I've got.

Tuesday, December 4, 2012
Haunted House Additions
Today I got to work on the haunted house again, and i have managed to
get a few more things done on it, such as adding scratches to it. I
still need to make the plats look a little less... lively. That could
take a while though. Anyways, this is what I've got.

Friday, November 30, 2012
O.P.P Room Continued
Today I had to add a door and a window to the room i created yesterday, using the line tool of course. Doing so made the room look more like a room than a bunch of random lines in Photoshop, so I am glad we did that today. Here is what I've added to the room.
 In case you were wondering, the red lines are lines I used to help guide the creation of the door and window, as well as for the dimensions of the room.

Wednesday, November 28, 2012
More One Point Perspective Practice
I did a little more practice on One Point Perspective (which from now on I am calling O.P.P), and using what I practiced, I made a 2-D room in Photoshop.
 Don't worry, I am still going to finish the haunted house, I actually had some time to do it after i was done with this.

Monday, November 26, 2012
Vanishing Point
Just a little practice finding the vanishing point of a photo. To help
do so, I used the line tool to highlight the lines in the photo that all
went into one spot. After doing that I used the ellipse tool to
highlight the area where all of the lines intersected. The horizontal
blue lines are lines that help define the points in the photo where
things are creating straight lines.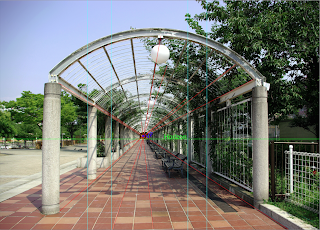
I am going to continue the haunted house, i was just instructed to do this before continuing.
Thursday, November 15, 2012
Slightly More Haunted Haunted House

Tuesday, November 13, 2012
Continueing the Haunted House
I have returned to the haunted house, and now i am working on making the roof look a little older. I think i may have to eventually use the Hue/Saturation tool to de-saturate the roof but right now i am just adding to it crackles from one of the images i have saved. Anyway here is what I've got.


Friday, November 9, 2012
Fievel GIF Final

Wednesday, November 7, 2012
Mouse!

Monday, November 5, 2012
Haunted House part 2
So far on the haunted house project i have broken a few windows, boarded up a window, and made the archway look older. I did this by using broken window pictures and cutting out the broken part, as well as using the multiply setting on the archway while a scratch box or crackle box was above it. On the boarded window, I used the inner shadow setting to make the wooden planks look as if they were inside of the window, and desaturated them to make them look older.
Tuesday, October 23, 2012
Haunted House!
Sorry to keep you waiting, but I have finally started my work on the haunted house! So far it doesn't look like much, but i have broken one of the windows and put the house into a lightning storm background. I have also removed the left side of the house because of the trouble the tree in the image would give me otherwise. Anyways here is what it looks like so far.


Wednesday, October 3, 2012
Top 5 Choices For Haunted House
I spent a little time looking for houses to use for the haunted house project and i found a few possible choices. The houses are in order from most favorite to least.


Monday, October 1, 2012
Spider-Doo Postponed
Unfortunately, i don't have the time to continue my Spider-Doo image in my computer graphics class due to the fact that we have to move on to a haunted house project. However, i do have some good pictures for haunted houses for the project.


 This does not mean i will not finish the Spider-Doo project, only that i dont have time as of right now, but it will be finished in the future.


Thursday, September 27, 2012
Spider-Doo

picture and put it on Spider-Man's body, then make it look as if Scooby's head was actually there before by using the lasso tool to cut out the webbing on Spider-Man's mask and put it on Scooby's face. I'm not done yet but I think I am making good progress.
Tuesday, September 18, 2012
Finished Zebra Rhino

Friday, September 14, 2012
Zebra Rhino

Wednesday, September 12, 2012
Finished Statue of Liberty

Monday, September 10, 2012
Statue of Liberty So Far

Thursday, September 6, 2012
Dog Project
FINAL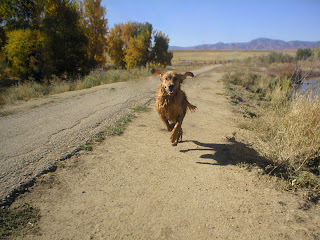
In this project i had to get rid of some telephone poles, a wooden post, and a person in the back of the picture. I would say the hardest part of this project was the phone poles due to the fact that i had to fix the mountains after removing the poles, which took a little bit of time.
Brothers project
FINAL
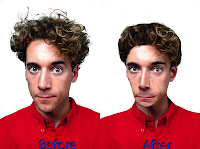 One of my projects from digital evolutions. In this project you have to use the liquify tool, take the person on the left, and change the way he looks so that it looks like the person on the right is his brother. One of the easier projects considering nothing had to be removed.
Tuesday, September 4, 2012
Removing Items From a Picture
FINAL
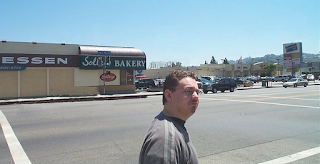
Another project from digital evolutions. In this project i removed some poles, a Kinko's sign, and a car. The car was a little difficult because i had to try not to destroy the sidewalk or the road, but i got it done.
Subscribe to:
Comments (Atom)